Sunday, July 7, 2013

Lesson Plan- Berries and Pollination

Nature School
August 29th, 2011

Welcome song

Letter of the Day- B. For berries, birds, beautiful, bee, buzz,

Today we are going to be learning about berries and pollination.

Pollination
Who remembers this word- Pollination?

What is pollination? Pollination is what happens when a flower turns into a seed, or a berry, or a fruit. The flower is beautiful and attractive and smells wonderful. Little insects come and get nectar from the flower. When they land on the flower, they get a little bit of pollen on them. Then they spread that pollen to the next flower they go to. That is exactly what the flower wants to have happen!!! Spreading pollen from one flower to the next is great!! Then the seed begins to grow.

We, humans, love to eat the seeds, berries, or fruit that come from the flowers of plants after they are pollinated. Do you want to see some seeds of some plants we eat? Can you guess what plant they come from?

Senses Walk
Use a bandana or scarf to blindfold your budding naturalists and then carefully guide them through the park on a hike. Encourage them to use their other senses to experience the trip. Guide them towards trees and have them touch the bark, leaves and branches. What do they feel like? Have them stand still and listen. What sounds can they identify? What do they smell? Now switch places and let your child guide you!

Nature Scavenger Hunt
Hand out papers and pens

Nature collection and berry picking
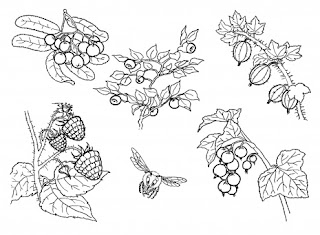
We are going to pick some berries while on our hike today. With those berries, we will make a special ink that pioneers used long ago. Blackberry juice was used to dye cloth navy blue and indigo.

So, i want you to collect some different things in your bag. Berries, of course! I also want you to look for natural materials that you can use as a paintbrush- leaves, grass, sticks, stems, dandelions and other flowers, evergreen twigs, etc. Be creative! Put them in your bag and we will use them when we are done with our hike.

Pioneer Craft:
Homemade Ink from Berries
True ink could be very expensive so many pioneers had to make their own. Inks were made at home from many different ingredients depending on what color was needed or wanted.

According to different sources, they used berries, powdered roots, nuts, and even chimney soot.

Ingredients:
1/2 cup of ripe berries (blueberries, cherries, blackberries, strawberries, elderberries, raspberries, etc.
1/2 teaspoon vinegar
1/2 teaspoon salt

Tools:
measuring cups and spoon
strainer
bowl
wooden spoon

Directions:
1. Fill the strainer with the berries and hold it over a bowl.
2. Using the rounded back of a wooden spoon, crush the berries against the strainer so that the berry juice strains into the bowl.
3. Keep adding berries until most of their juice has been strained out and only pulp remains.
4. Add the salt and vinegar to the berry juice. The vinegar helps the ink to retain its color and the salt keeps it from getting moldy.
5. If the berry ink is too thick, a tablespoon of water.

Craft:
Use the ink and the natural paintbrushes the children collected to paint a picture. Let the children incorporate natural materials into their picture using glue and scissors.

Lesson Plan- Ladybugs


Nature School
July 1st, 2013
Ladybugs

Welcome Song

Letter of the day

Ladybug fun facts:
1.   There are about 4,300 kinds of ladybugs in the world.
2.   Female ladybugs can eat as many as 75 aphids in one day!
3.   Ladybugs smell with their feet and antennae.
4.   A ladybug’s jaws chew side to side instead of up and down
     like our jaws.
5.   The color of a ladybug’s spots begin to fade as it gets older.
6.   Ladybugs are most active when their body temperature is 75 degrees    
     or warmer.
7.    A ladybug’s bright color warns birds that it does not taste good.
8.   When a ladybug flies, its wings beat 85 times every second.
9.   There are almost 400 different kinds of ladybugs in North America.
10. Female ladybugs are larger than male ladybugs.

Craft:
Cut and paste- Ladybug Life Cycle

Life Cycle:
Ladybugs aren’t so cute when they’re born—you may not even recognize them.
They hatch from eggs and look like tiny alligators. The new bug is called a larva, and it takes about 21 days for it to grow up to be a ladybug beetle.
Eggs
Mother ladybugs lay 10 to 15 eggs on the underside of a leaf. They look like tiny, elongated yellow jelly beans.
Larva
Larvae crawl out of their eggs and begin to look for food. Mother bugs make sure there are lots of aphids or mites nearby because the larvae will eat a lot of them before they become adults. Ladybug larvae look like tiny alligators—and they bite!
Bigger Larvae
After a few days, the little larvae begin to grow, and soon they shed their skins. This is called “molting,” and it happens several times. If you look closely you can see old skins clinging to leaves or to the grass in your ladybug jar.
Pupa
In about two weeks, the bigger larvae begin to look a little different, something like a lobster without legs and claws. They attach themselves to a leaf and hardly move at all. They are doing something extraordinary under their skins.

Imago or Adult
In another few days the ladybug splits its pupa and emerges looking very different. For the first few hours it’s pale and soft. Its shell quickly hardens. Its color becomes brighter. Now it looks just like its mother—a perfect adult ladybug beetle. What seems like amazing magic is one wonderful way the natural world works: ladybug metamorphosis.

How many of you have ever seen a real live ladybug? Did you pick it up? Were you afraid of it? Not very many people are afraid of ladybugs, are they? Ladybugs are kind of pretty, aren't they? When you see one it is hard not to want to pick it up and look at it a little closer. They kind of tickle when they walk on your arm, don't they?
Most people don’t mind having them around especially people who like to grow fruits and vegetables and flowers. They are glad to see them because they know that ladybugs are very helpful.
Along time ago the farmers in California had a big problem. Some very harmful insects, called the cottony-cushion scale, were eating and killing all their orange trees. They found out that the bug had been brought over from Australia by mistake on some ships. The insects weren’t so bad in Australia because Australia had ladybugs that ate the cottony-cushion scale. These farmers knew that they needed the Australian ladybugs to help them save their trees. So 500 ladybugs were sent to California. When they arrived they started eating the cottony-cushion scale and within two years the trees were saved. Yes, those ladybugs were very helpful. The trees were no longer dying.


Games:
Ladybug matching game

Ladybug fly through my window

Ladybug, Ladybug
Written by Nancy Foss
Ladybug, Ladybug turn around. (Have the children turn around.)
Ladybug, Ladybug touch the ground. (Have the children touch the ground.)
Ladybug, Ladybug show your love. (Use the sign language sign for "I love you.")
Ladybug, Ladybug point to heaven above. (Point up.)
Ladybug, Ladybug stomp your feet. (Stomp your feet.)
Ladybug, Ladybug take a seat. (Children all sit down.)
A Teeny, Tiny Ladybug
Written by Nancy Foss
(Sing to the tune of "Itsy, Bitsy Spider)
A teeny, tiny ladybug crawled up my arm this way. (Walk your fingers up your arm.)
Giggle, giggle, giggle this is what I say. (Hold your belly and laugh.)
Along came the wind and blew my friend away. (Blow wind with mouth and wave your arms.)
Out came the sun and my friend is here to stay. (Make sun with your arms.)
With a giggle, giggle, giggle we'll have fun today. (Hold your belly and laugh.)

Sunday, June 9, 2013

Lesson Plan- Trees


Nature School, June 10th, 2013
Trees
Supplies: Trees are Special book, Crayons, Paper, ink pads, Put Together a Tree supplies,


Welcome: Nature School song
Letter of the Day: T

Today we are going to talk about trees!

Group Activity:
First, let’s talk about the different parts of a tree. We are actually going to put a tree together (cut out parts of a tree and tape onto a piece of paper in the shape of a tree). Okay, what is the sturdy middle part of the tree that keeps it upright? (trunk) What about the part of the tree that is underground and sucks up water? (roots) What about the part of the tree that is like arms and sways in the breeze? (branches) And the small round or pointy things that help make food for the tree? (leaves)

Pretend Play:
Now let’s use our bodies to pretend to be a tree. What should our arms be (branches) and fingers (leaves)? What about our tummies and legs (sturdy trunk)? What about our feet (roots)?
Now, our roots needs to suck up water. Let’s all make a big huge slurping noise! Now, the water travels up, up our trunk (crouch down with hands on ground, then stand up tall raising hands up high). Now our leaves use the sunlight and water to make sugar and oxygen. We let the oxygen out of our leaves for humans and animals to breath (take a deep breath) and the sugar, we trees use to feed ourselves and grow bigger and taller (stand up taller and puff out chest).

Discussion:
We are really lucky to have trees. What are some things that you love about trees?
-They give us oxygen to breath fresh, clean air
-The provide us with shade on a hot sunny day
-Trees are fun to climb
-Many things we use are made out of trees- our houses, toys, beds, paper, pencils, bookshelves, etc.
-Trees make our world a more beautiful place
-Many animals use trees to make their home- bird, raccoons, squirrels, chipmunks, owls, snakes, monkeys,

Nature Walk:
Take about 20 minutes to let the kids explore and be creative.

Get to know a tree activity:
Have you ever met a tree?
I want each child to find a tree to meet. Let me show you how. Oh, here is an interesting looking tree! Hello, nice to meet you. I’m going to be a nature scientist and learn all I can about this particular tree.
-Look for special traits- branches, bark, leaves, roots, markings, mushrooms, holes, etc. Let the kids get to know it by smelling, touching, listening, looking with magnifiers.
-Have the kids sit under the tree and look up into the branches. What kinds of animals might live here? Now everyone be very quiet and listen to our tree. What does it sound like? Do we hear birds, squirrels, branches creaking?
-What about the soil around the tree. Is it wet, squishy, dry, hard, rocky, etc?
-Feel the bark. Does it feel soft, smooth, rough, cold, warm?
Bark rubbing- A bark rubbing is a way to remember our special tree and take a part of it home without hurting it. Give each child a crayon and piece of paper. Have an adult help hold the paper in place on the bark of the tree, while the child rubs a crayon back and forth over paper.

Games:
Play “Ring around the Tree” with the tree you have found. Have the kids make a circle around the tree by linking hands. Sing the following to the tune of “Ring around the rosie”
Ring around the tree, you are so tall and free
Wind blows, wind blows the leaves fall down!

Tree Tag
This is a very, very simple game that kids as young as 1 ½ can play!
Find an area with lots of trees. Have the kids stand next to a tree. When you call out “Switch!” they run to a new tree. Wait till all the kids have found a new tree, then call out “Switch” again. Kids love the anticipation and getting to run. We have played this game for a good twenty minutes before losing interest ;)

Book:
Read “Be a friend to trees”

Discussion:
Why are trees important?
-They give us air to breath- we could not live without them
-Wood to build things
-Nice to look at
-Homes for animals and insects
-Food for animals and insects

How can we take care of trees?
-Climb gently
-Plant a tree
-Protect forests

Craft:
Finger print tree craft. Give each child a piece of paper with a trunk and branches drawn on. Let the children use a stamp pad to make finger print stamps all over the branches as leaves.


Sunday, May 19, 2013

Lesson Plan- Inchworms


Nature school
May 20th, 2013
Inchworms

Welcome song

Letter of the day- I for inchworms

Facts:
-Inchworms are interesting! They are not actually worms- they are caterpillars. They metamorphose into brown moths called Geometer moths. These moths are like butterflies, but they are nocturnal!
-Inchworms are green, yellow, brown or grey. They protect themselves from predators by blending in with their surroundings!
-Inchworms love to eat oak tree leaves. Maybe we can find some inchworms by finding an oak tree and looking at its leaves!
-What do you think might eat inchworms? birds, wasps, lizards, spiders
-Inchworms can spin thread, like spiders! They use the thread they spin to drop to the ground
-Inchworms don’t have to drink water because they get all the water they need from the leaves they eat.

Pretend Play:
They move by looping their bodies. They do this is because they have three pairs of legs in the front and two or three pairs in the back, but no legs in the middle of their abdomen. So they move by bringing their hind end towards it’s front, over and over. Let’s pretend to be inchworms!

Fingerplay:
Inchworms
5 little inchworms crawling up my door
one fell off and then there were 4
4 little inchworms inching up a tree
one fell off and then there were 3
3 little inchworms crawling on my shoe
one fell off and then there were 2
2 little inchworms in the summer sun
one found some shade, then there was one
1 little inchworm tired from the fun
inched off to bed, then there were none

Craft: Inchworm bracelet
Pasta dyed green
Twine cut to the size of child’s wrist + a little
-have the children string three pieces of pasta onto twine. Tie around wrist

Books:
Inch by Inch

Math/Science:
Let’s all collect some little twigs, leaves, flowers, and sticks! Then we will measure them and see how many inches long they are. They we will make a little chart to compare!


Sunday, May 5, 2013

Lesson Plan- Clouds


Nature School
May 6, 2013
Clouds!

Welcome Song

Hello everyone! I’m so excited to see all you kiddos today! We are going to have so much fun on our hike, looking for some interesting things in nature. Today, we are going to learn about something that we see up in the sky, it’s big and white and sometimes round of puffy shaped. What is it? Clouds!

Letter of the day- C

What are clouds?
Did you know that clouds are a collection of tiny, tiny water droplets way high up in the sky?

How do clouds form?
All air around us has water in it. Did you know that? The water in the air gets warm. It starts to rise up. It goes so high in the air, but way up high the air is actually colder. There are also little air dust particles up high in the air that the water vapor clings onto. When they all clump together, then clouds are formed. When there gets to be too much water in the cloud, then it rains!

Science experiment-
2 Plastic bags
2 cups
water
Let’s put some water in this cup and place the cup in this plastic bag. One of the bags we will leave open and the other, we will close. What do you think is going to happen? Let’s see what happens when we get back from our hike and talk about it.

Clouds are really cool. They can tell us things! Did you know that you can tell what kind of weather is coming by looking up in the sky at the clouds?
- Long, wispy cirrus clouds= pleasant or fair weather. Usually indicate a change in the weather in the next 24 hours
- Cirrostratus clouds= long, sheet like cloud that covers entire sky, but sun or moon can still be seen through them. They usually indicate there will be rain or snow in the next 12 to 24 hours
- Puffy, cotton ball Cumulus clouds= good weather!
- Thick, grey Stratus clouds= that is what we have in Seattle almost all winter. These clouds mean a little drizzle here or there
Let’s all lie on our backs and look at the clouds for a bit. What shapes to do you? Do you think the clouds are high or low? Are the moving fast or slow? Are the white or grey?

Story- Drippy the raindrop (cutouts of drippy, salty, tree, cloud, and sun)
Once upon a time there was a raindrop named Drippy (picture of drop of water). Drippy was having fun! He was doing his favorite thing in the whole wide world- lying on his back floating in the ocean. He looked up at his good old friend Mr. Sun, who had just come up (hold up picture of sun). Mr. Sun rose higher and higher and Drippy got hotter and hotter!

Just then, Drippy saw a big, dark cloud moving across the sky. “I wish I could go up to that cool looking cloud and cool down a bit!”

All of a sudden, Drippy felt himself rising up into the air! He was evaporating! Can we all saw evaporate together? EVAPORATE!
He landed softly on a huge, fluffy cloud. There were thousands of other drops of water too. One of the drops of water called out to Drippy, “Ahoy there! I’m Salty!” (hold up picture of another drop of water with captain hat on).

“I’m Drippy! Nice to meet you. Where are we headed?”

“We are going right toward those mountains over there and it looks like a storm is a brewing. If things get rough, just abandon ship. Jump right off the cloud and toward the earth” Salty said.

After awhile, things did start getting rough. Drippy got ready to jump. 1-2-3-JUMP! Drippy was raining now! He fell with millions of other raindrops down toward the forest near the mountains.

Drippy landed right on a tree (show picture of tree with roots). He slid down on leaf onto a branch and then down the trunk. Down, down, down he slid down the trunk and into the soil near the tree’s roots. Wow! What an adventure we was having. When we reached the soil, he found lots of other water drops there too. They were filling up the soil pores. He sunk deeper into the soil and into an underground stream. Then, guess what happened? The underwater stream came out of the ground as a spring!! The stream was now above ground. The stream eventually led him out into the ocean again!

Drippy leaned back, floating on his back and looked up at his good friend Mr. Sun again. “Hello there, Mr. Sun!” What an adventure I’ve had! I’ve been through the water cycle. Can you all say WATER CYCLE? I’m learned so much and seen so much of our beautiful earth. What a wonderful world we live in!”
The end

Craft-
Paper clouds
Yarn
Paper rain droplets
Give each child a cloud, three pieces of yarn and three rain droplets. Let them color the rain droplets or cloud if they would like. Have them glue the cloud down on another piece of paper, hang yarn from cloud, then attach the rain droplets.

Song- to the tune of “the farmer and the dell”
The clouds are floating by
the clouds are floating by
heigh-ho, just watch them go
the clouds are floating by

They’re sometime high or low
they’re sometime high or low
heigh-ho, just watch them go
they’re sometimes high or low

Clouds move fast or slow
clouds move fast or slow
heigh-ho, just watch them go
clouds move fast or slow

Monday, April 15, 2013

Lesson plan- Pillbugs


Nature School
Pill Bugs
April 15th, 2013


Welcome Song


Letter of the day- P for pillbug


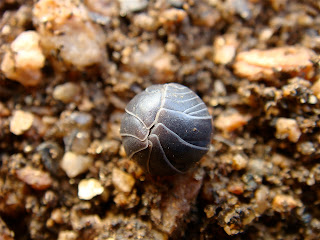
Today we are going to learn about Pill Bugs! Sometimes we call them Potato Bugs or roly-pollies. Has anyone seen one before? Sometime we find them rolled up in a ball or under dried leaves. Have you ever looked under a rock or piece of wood and found some pill bugs?

Can you try and roll up like a pill bug? Let's all try!


Pictures of pill bugs:


Pill Bug facts:
-They live in your garden, under a flower pot, under rotting leaves, anywhere where they can eat rotting and decaying matter.
-They like to eat all the time! Their poop is square shaped! Isn't that strange?
-Pill bugs are not insects at all! They are crustaceans- like crab and shrimp
-Pill bugs live on land- but they can swim for a little bit if they accidently fall into the water
-In addition to eating decaying matter- pill bugs also eat bits of concrete and rocks to help with their digestion
-To protect themselves against predators (ants, frogs, lizards, lots of animals), they roll themselves into a ball.
-They have an exoskelton which they shed many times as they grow. First they shed their rear half, and the next day they shed their front half.
- In the fall, they dig deep into the ground and sleep until spring!


Pill Bug races- Use markers stacked top to bottom, lie them down on the ground to make different track lanes. Line up pill- bugs and let them go.

Make a pill bug maze with rocks, twigs, and sticks. See how quickly the pill bug can make it’s way through the maze.

Roly-poly relay races:
Tie two kids legs together like a two legged race. Tell the kids that they are like a pill-bug and must work together to coordinate their movements. Pill-bugs have seven pairs of legs!


Make a Pill Bug House:
1. Put a few inches of soil into the box
2. Find a rock or piece of concrete in the box
3. Find some moss, piece of potato, carrot peelings, bits of fruit, bit of lettuce. Mostly, pill bug love dried leaves and rotting pieces of wood. And a bit of shredded newspaper
4. Find a few pill bugs. Look under leaves or turn over a rock
5. Keep your pill bug home moist by spraying lightly with water once a day